Notification Setup & Tips
A primary function of Formsite forms is to send an email notification when a form or survey has been received. In its most basic form, the notification is simply an email. Our added features make your form notifications powerful, personalized, and much more useful.
Notification Setup
Your new form will not automatically send you an email when your form is completed, so we need to set up a notification at Form Settings -> Notifications. Here you can customize the standard email fields To, From, Subject, and Message.
Quick Setup:
- Add your email address into the box next to Defined Address on the To line.
- Click Save.
Send Multiple Emails:
Need to send more than one email, such as one to you as a submission notification and one as an auto-responder to the form visitor? Make as many notifications as you need by clicking the New Notification button in the left column.
Every notification will occur with every form submission, as long as the Conditional Logic matches. Read more about Conditional Logic below.
Auto-responder Setup:
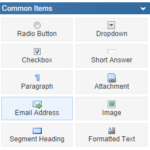
 Insert an Email Address item into your form. Note that the Email Address item is a special field.
- Go to Form Settings -> Notifications and click the dropdown menu in the To area to see your available email fields.
- Select your Email Address item to send your auto-responder to the visitor’s email.
Personalize & Customize
Whether your notification is an auto-responder or results email to you, the ability to personalize and customize the message is essential. Some examples of how to use these features include:
- Using the visitor’s name
- Using a selected item, as in a confirmation or receipt
- Sending a different message based on a selected answer
Using Answers in Notifications:
- To insert visitor answers into your notification subject or message, use a pipe code. Start by clicking the Insert Pipe link at the top of the notification page.
- The window that appears will contain a list of your form items. Select the item from the dropdown menu and copy the provided code.
- Paste the code into your subject or message where you want that value to appear.
- Click Save.
Tip: For non-required fields, add to your pipe code a default value in case the visitor doesn’t enter an answer. For example, if you want to include a welcome message in your notification but the Name field is optional, your message could be either “Welcome, Billy” or “Welcome, Formsite Customer”. Use the format [pipe:X?Formsite Customer], where X is the id of the Name field. Read more about pipe codes.
Order Confirmation or Receipt:
- If your form contains Order Form items, check the box next to Include Order Summary to add the order details to the notification.
- If you want to create a custom confirmation, use the process above to pipe the form values into your message.
Conditional Logic:
If you want to control when to send a notification, use the Conditional Logic area. Examples of when to use this feature:
- Only send if the order was successful
- Send to the appropriate department only
- Send a thank-you if the optional donation was made
- Notify me if someone changes the results table
Successful Orders Only:
- To receive notification of orders but not the incomplete ones, check the box next to Use Conditional Logic.
- Select the Successful Payment option.
- Click Save.
Send to Different Addresses Based On Form Answers:
- Create a new Notification, entering the destination address in the To field.
- Customize the Subject, Message, and/or form results view.
- Check the box next to Use Conditional Logic.
- Select Send After Result Submitted.
- Select the appropriate question and answer under Rules. For example, if the question “Department” is “Sales”, then the notification would be sent.
- Click Save.
As always, we welcome questions and comments by contacting Formsite support.